
Reusing glass panels is one of those ideas that sounds simple—until you actually try it. Maybe you’ve salvaged panels from an office refit, removed a shower screen during renovations, or inherited balcony glass from a previous installation. Done properly, reusing glass can save money and reduce waste. Done badly, it can lead to leaks, cracks, or serious safety problems months later.
This guide is written for real people working on real projects. No fluff—just practical, field-tested advice on how to clean, inspect, prepare, and reinstall used glass panels safely.
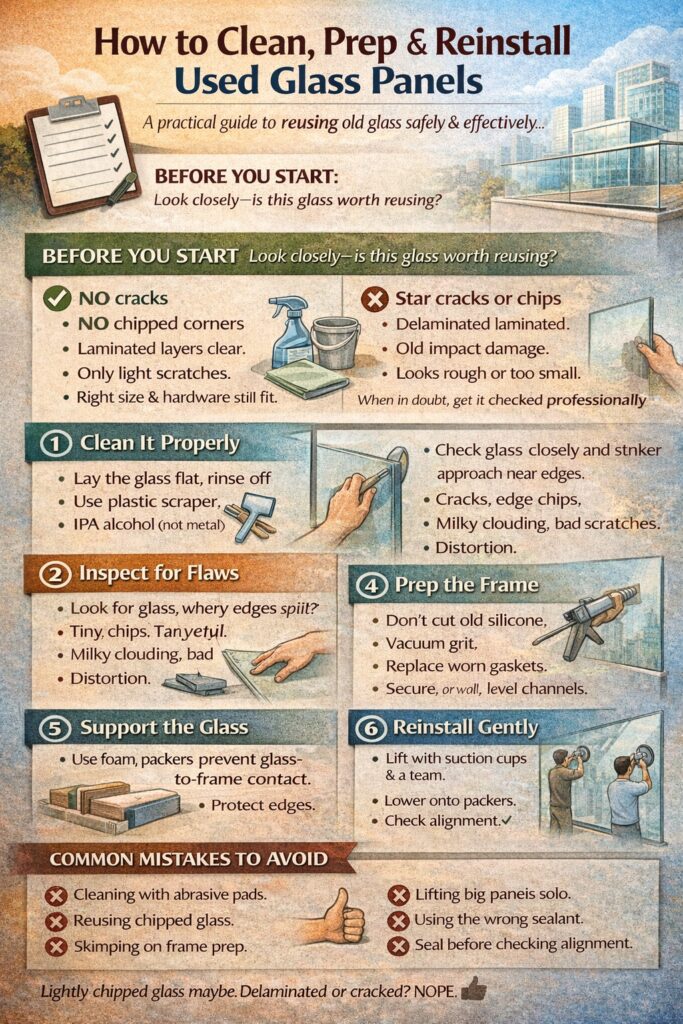
First Question: Should This Glass Even Be Reused?
Before you clean anything, slow down and look closely.
Some panels are simply not worth reinstalling—especially if they once formed part of a safety barrier.
✔️ Usually safe to reuse if:
- The surface is free from cracks.
- Edges are clean and unchipped.
- Laminated layers aren’t cloudy or peeling.
- Scratches are light and cosmetic.
- The size still suits the new opening.
❌ Walk away if you see:
- Star cracks or impact marks.
- Chips near corners or edges.
- White or milky lines in laminated glass.
- Deep gouges.
- Evidence the panel was previously overloaded.
If the glass was part of a balustrade, roof light, or large façade, get it checked professionally before reusing it.
What You’ll Need Before You Start
Having the right kit makes everything calmer—and safer.
- Glass cleaner or mild detergent
- Isopropyl alcohol for sticky residue
- Microfibre cloths
- Plastic scraper
- Silicone remover
- Suction lifters
- Edge protectors or foam pads
- Glazing packers / setting blocks
- Neutral-cure silicone
- Gloves and eye protection
Step 1: Clean It Properly
Lay the glass flat on padded supports so grit can’t scratch it.
Rinse first to remove dust and sand. Then wash with mild detergent or proper glass cleaner. Wipe in straight lines—not circles—using microfibre cloths.
Removing old mess:
- Tape residue: peel gently, then wipe with alcohol.
- Silicone: soften it with remover and lift using plastic tools.
- Paint spots: dab with alcohol and gently lift.
⚠️ Avoid metal blades unless you’re experienced—they scratch coatings faster than you think.
Step 2: Inspect Like You’re Looking for Trouble
Once it’s spotless, move it into bright light and examine every inch.
Run your eyes—and fingers—along the edges.
Look for:
- Tiny chips.
- Hairline cracks.
- Cloudy laminated layers.
- Surface scratches you can feel with a fingernail.
- Distorted reflections.
Edge damage is the biggest red flag. That’s where stress cracks usually start.
If you’re unsure, don’t gamble. Glass rarely “gets better” once it’s back in service.
Step 3: Measure Again (Even If You’re Sure)
Openings shift during refurbishments. Frames twist. Floors settle.
Measure:
- Top, middle, and bottom widths.
- Left and right heights.
- Glass thickness.
- Squareness.
- Space for seals and packers.
Glass should drop into place with small clearances. If you have to force it, you’re setting yourself up for a delayed crack later.
Step 4: Prepare the Frame or Channel
Old sealant, grit, and warped supports cause more failures than most people realise.
Strip out everything:
- Remove all silicone.
- Vacuum debris.
- Replace brittle gaskets.
- Check drainage paths in window frames.
- Make sure channels are level and secure.
For balustrades or partitions, tighten fixings and look for corrosion.
Step 5: Support It Correctly
Glass should never sit directly on metal or timber.
Before lifting:
- Place glazing packers where the weight will rest.
- Fit edge protectors if moving through narrow spaces.
- Keep spacers ready for side gaps.
Packers spread the load and stop the panel from grinding against the frame.
Step 6: Reinstall With Patience
Big panels are a two- or three-person job. No heroics.
Use suction cups. Lift vertically. Lower onto packers—not onto the frame.
Check:
- The panel is plumb.
- Gaps are even.
- Nothing is pinching.
- Fixings don’t touch the glass directly.
For balustrades, confirm handrails and clamps align before tightening anything fully.
Step 7: Seal and Finish
Only seal once the glass is perfectly positioned.
Use neutral-cure silicone made for glazing.
- Mask edges.
- Apply smooth, continuous beads.
- Tool neatly.
- Remove tape straight away.
- Let it cure fully before cleaning or loading the glass.
Never rush curing time—most leaks happen because someone “just touched it up” too early.
Application-Specific Tips
�� Windows
- Keep drainage slots clear.
- Check seals compress evenly.
- Make sure thermal breaks aren’t bridged.
��️ Balustrades
- Only reuse laminated panels in perfect condition.
- Torque fixings correctly.
- Fit handrails before final tightening.
- Don’t compromise here—falls are unforgiving.
In case used glass doesn’t fulfill your requirements then you can consider buying a new custom balustrade glass panel for your project.
�� Partitions
- Align tracks carefully.
- Allow movement gaps.
- Add manifestation markings for visibility.
In case used glass is not according to your requirements then you can buy new custom glass partitions here.
Common Mistakes That Cause Failures
- Using abrasive pads.
- Reinstalling chipped glass.
- Skipping packers.
- Forcing tight fits.
- Using acidic sealant.
- Lifting large panels solo.
- Sealing before alignment is checked.
Most breakages don’t happen on day one—they show up weeks later when temperature changes add stress.
Final Word
Reusing glass panels can be smart, sustainable, and economical—but only when done properly.
Take your time. Clean thoroughly. Inspect ruthlessly. Prepare the frame. Support the glass correctly. Seal with care.
If anything feels questionable—especially with structural or safety glazing—stop and get professional advice. Visit here for any advice or want to buy a new tempered glass cut to size panel for your project
Glass is unforgiving when rushed, but incredibly reliable when treated with respect.